Chart your course
How to Rig and Use a Preventer
Quick answer
The short version
A preventer is a line system that restrains the boom from crossing the boat during an unintended gybe. A practical cruising arrangement usually leads from a suitably strong point on the boom forward to a rated turning point, then aft to a place where crew can tension and release it safely. The exact boom attachment, deck fitting, line strength, and lead must suit the boat. A preventer reduces unintended movement; it does not make a poor downwind course safe or allow people into the boom's arc.
Improvised short restraints can create damaging shock loads and may be impossible to release when loaded. Rig design matters, so use the boat manufacturer's, rigger's, or experienced skipper's approved arrangement. This article explains what to look for, not dimensions for an unknown boat.
Review how to gybe a sailboat, how to sail wing-on-wing, and boom vang vs mainsheet vs traveler. Keep crew clear of every loaded line and bight, and stop if a fitting's rating or lead is uncertain.
Know what the preventer actually does
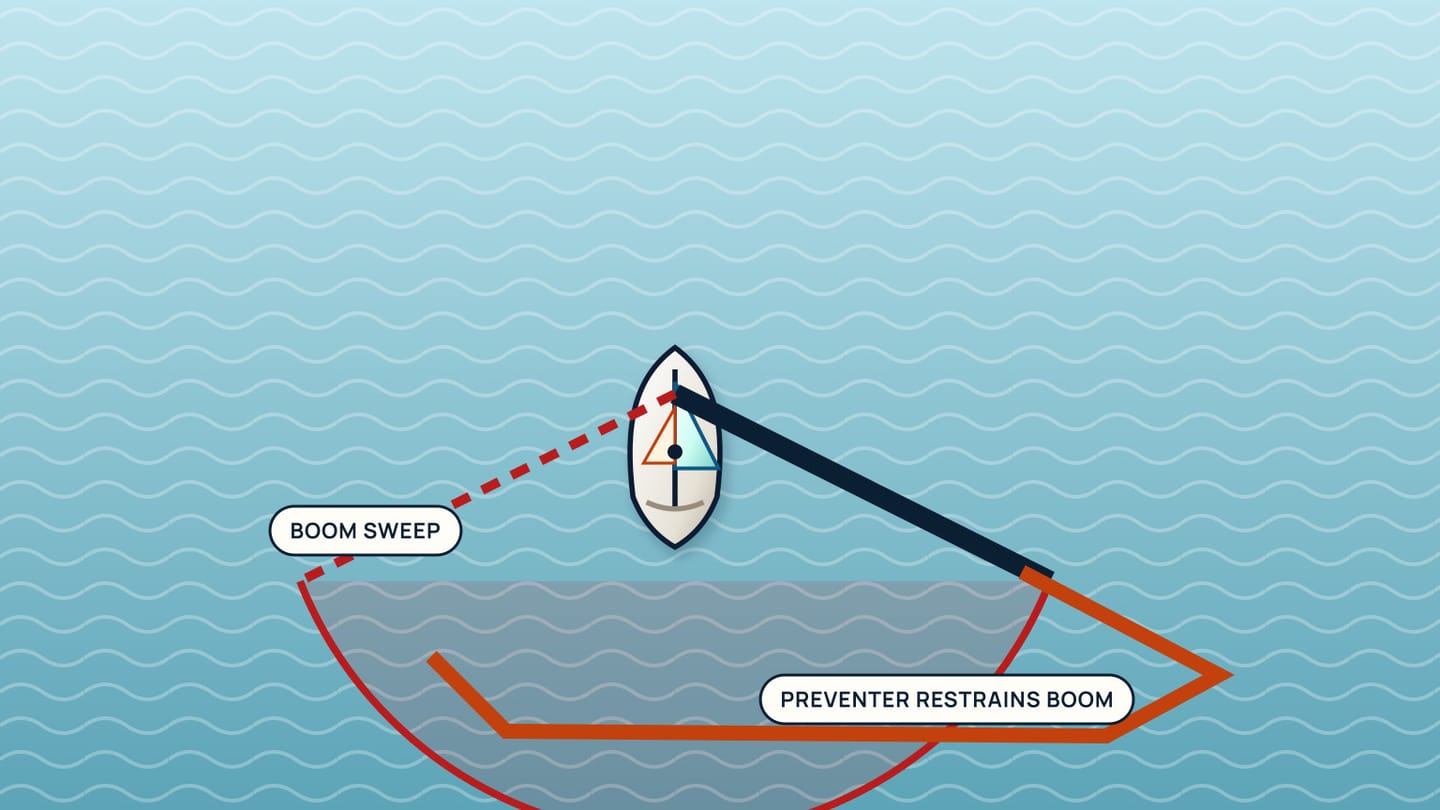
Downwind, the apparent wind approaches from aft and the mainsail sits far out. If the boat yaws or the wind crosses the stern, the mainsail can fill on the opposite side and drive the boom across. A preventer opposes that first movement by holding the boom toward its set side.
It does not steer the boat. It does not eliminate sail load. If the sail backs against the preventer, forces can rise while the boat is still on the wrong course. The helmsman must correct promptly and the crew must be able to ease through the designed control.
The system also differs from a boom brake. A brake is designed to add controlled friction during movement, while a preventer restrains the boom from beginning the crossing. Products and rigs vary; do not swap instructions between them.
Before rigging, identify the boom's travel, mainsheet sweep, companionway, helm, and crew seats. The protected area is useful only if the line introduces no new trap across those paths.
Lead the system forward before returning aft
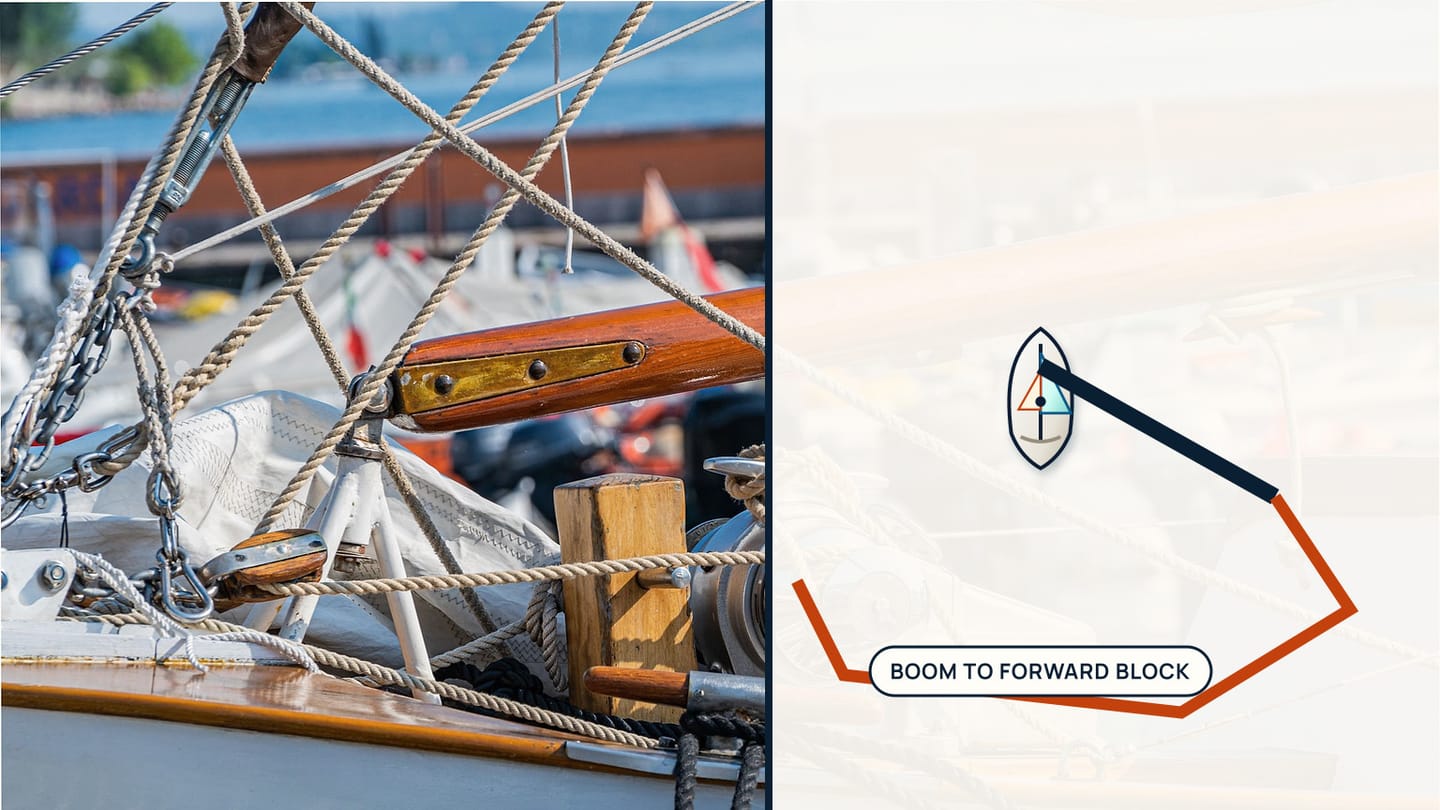
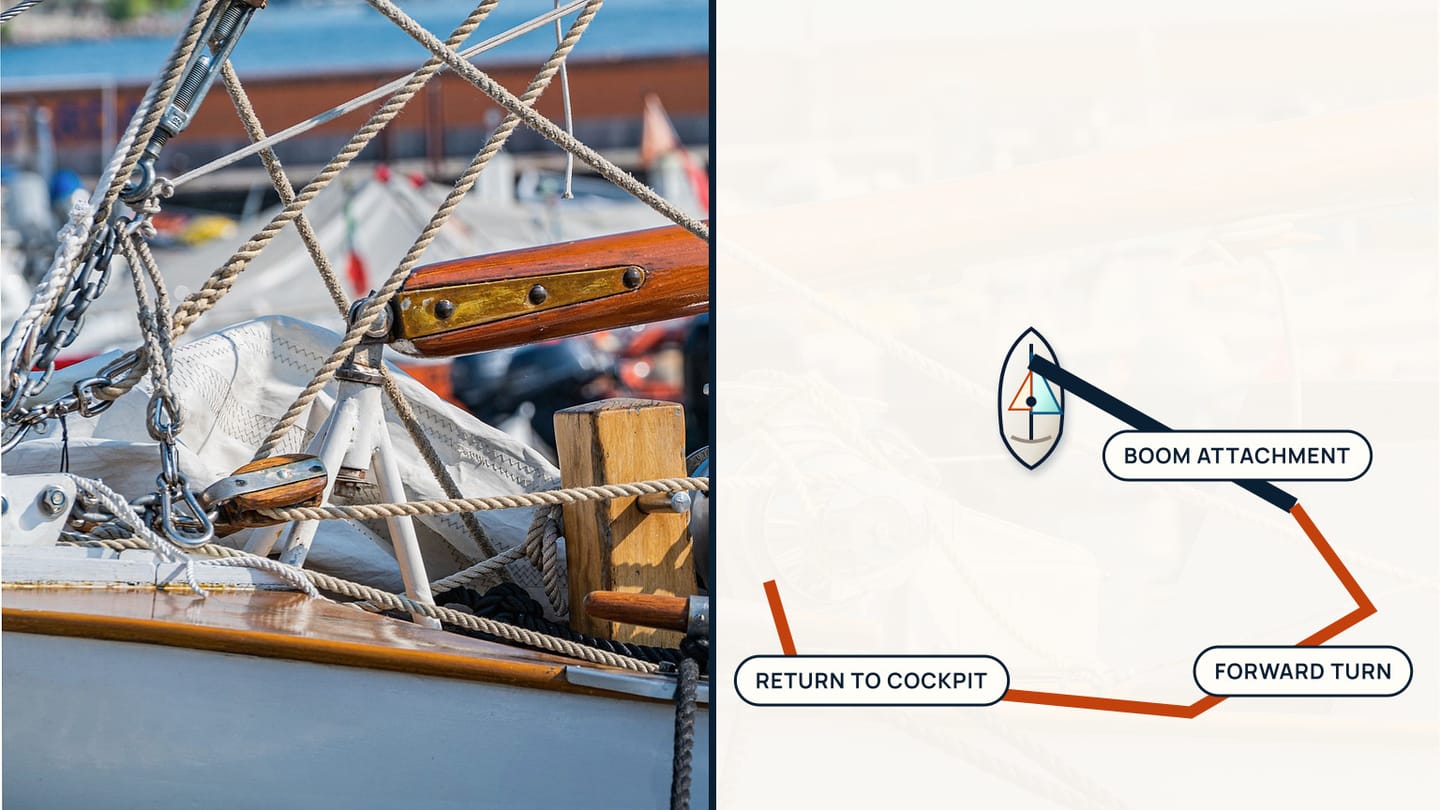
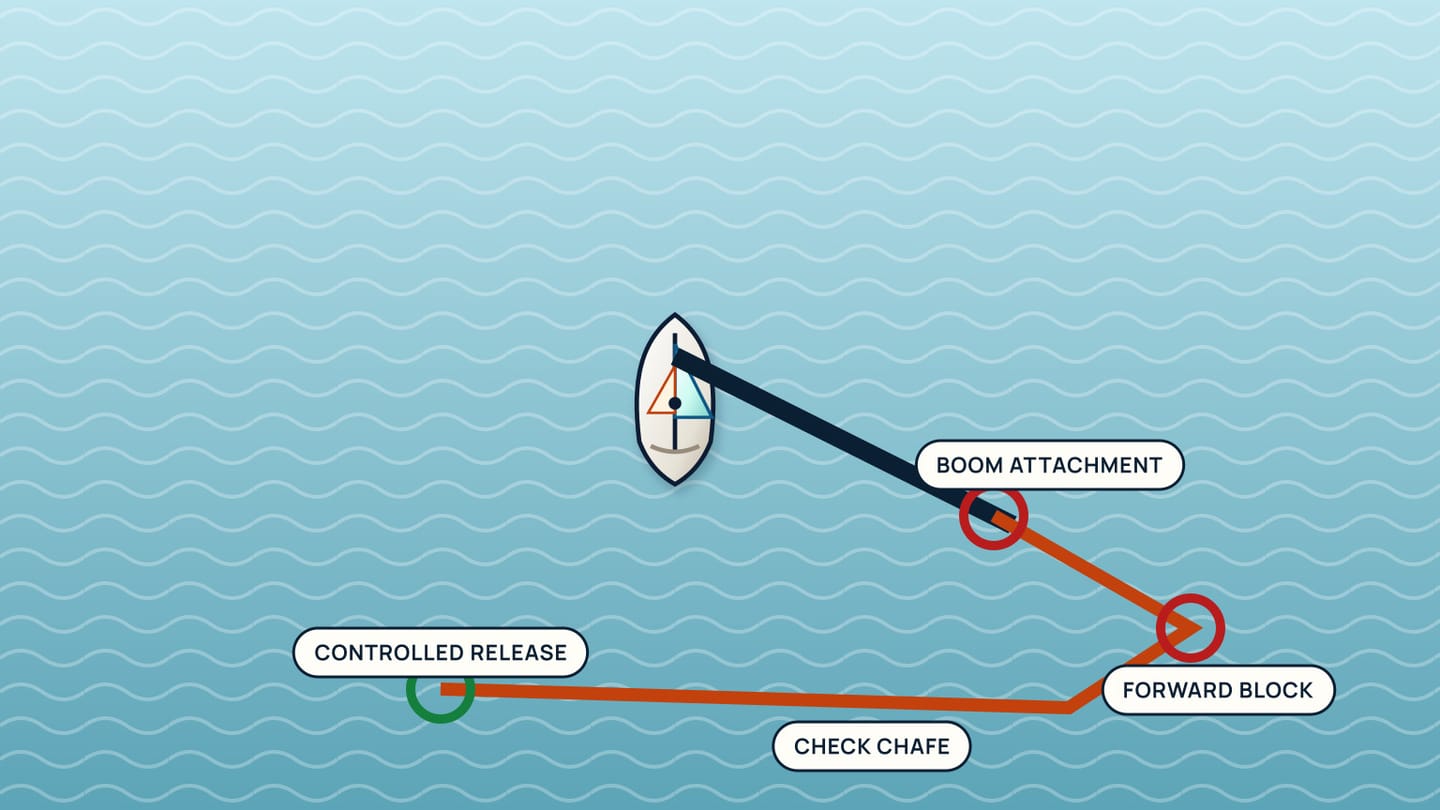
A forward lead creates a favourable angle to restrain the boom along its length. The line commonly runs from an approved boom point to a strong forward turning point and back to the cockpit. A short tie from boom to a nearby deck fitting can load both fittings harshly and give little control.
Every component needs an appropriate working load: boom attachment, line, block, deck fitting, cleat, and any connector. The weakest part defines the system. Only the boat designer, manufacturer, or qualified rigger can confirm suitability for a particular installation.
Keep the lead outside stanchions, hatches, lifelines, anchors, and sheets as the design requires. It must not saw across a sharp edge or block access forward. Rig it at the dock with the boom supported and lines unloaded, then move the boom through its permitted range to reveal fouling.
Many crews rig a line on each side before sailing downwind so a gybe does not require reaching forward. Whether that works depends on the deck layout. The lazy side still needs secure stowage outside the water and moving gear.
Set it before the risky downwind leg
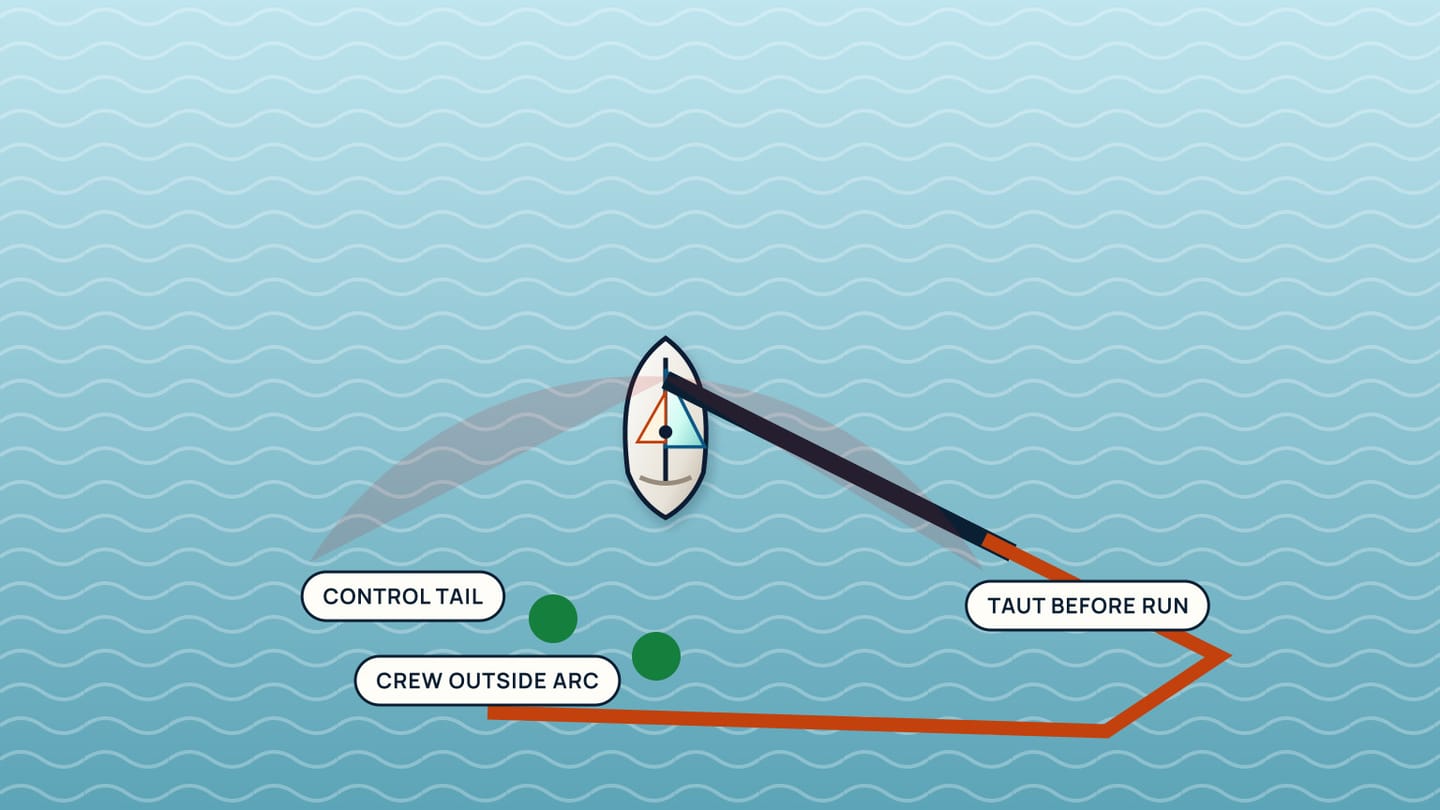
Establish the course and mainsail, then tension the preventer through its intended control until slack is removed without distorting the boom or rig. Coordinate with mainsheet and vang. Three controls fighting each other create load without better trim.
Set the system while crew positions are stable and the boat has sea room. Do not wait until repeated rolling has already brought the boom close to centreline. The trigger belongs in the passage brief: before wing-on-wing, before a long run, or before a known quartering sea, as appropriate to the skipper's procedure.
Keep the working tail organised for release. It should reach a winch or cleat specified by the setup and remain free of knots or gear that could jam. No person sits inside its bight or steps over it under load.
Test understanding aloud. The helmsman names the safe steering side. The trimmer points to the release. Another crew member identifies the boom arc. If those answers are not immediate, resolve them before continuing downwind.
Gybe by transferring control deliberately
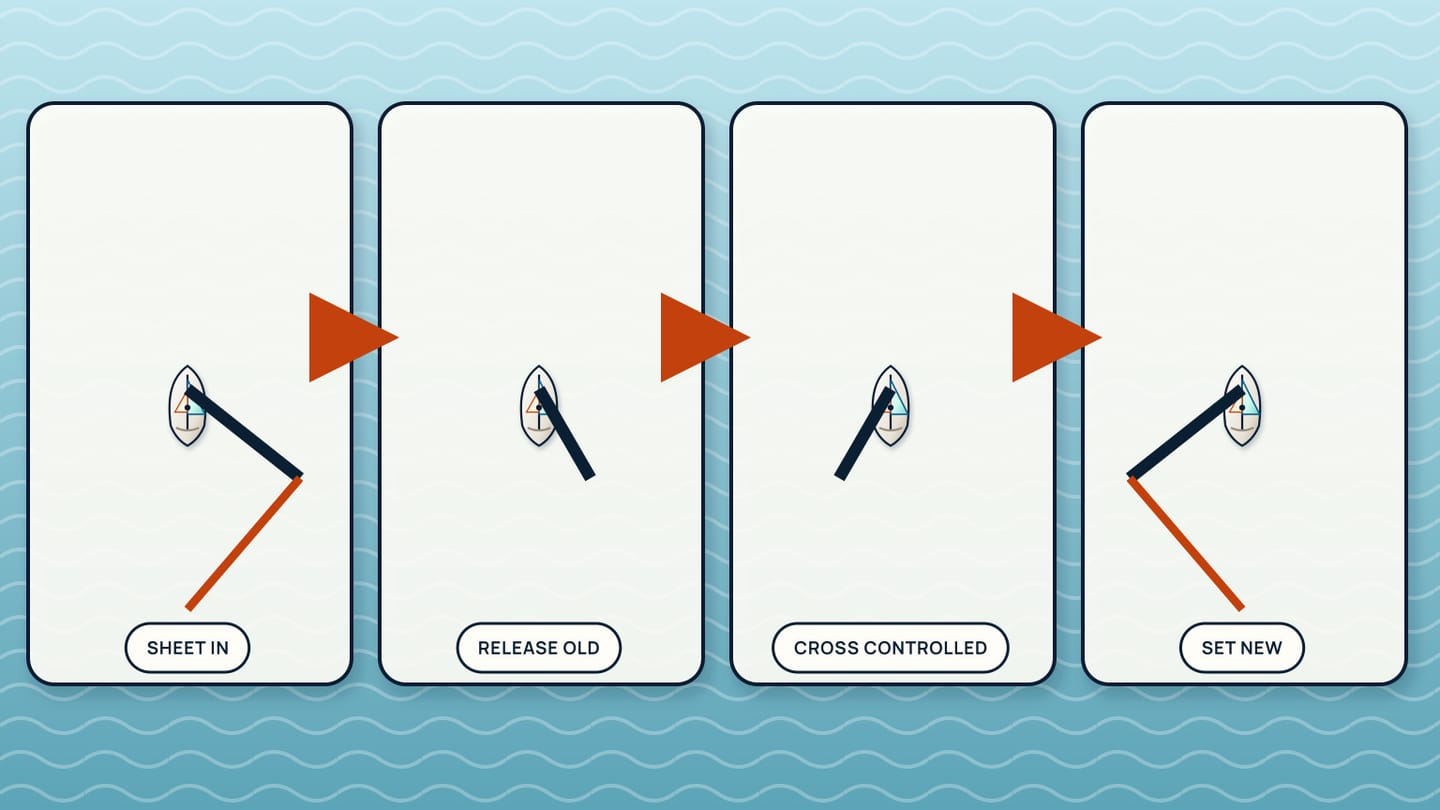
A planned gybe requires the preventer to be released or transferred in sequence with mainsheet and helm. The exact sequence varies by rig. Follow the boat's procedure and rehearse it in light conditions with an instructor.
The principle is controlled load transfer. Bring the boom under mainsheet control, ease the working preventer through its safe control point, complete the gybe, then set the new-side preventer after the boom is stable. Releasing a fully loaded line without control can make it run violently.
Do not leave both sides hard on. Opposing restraints can lock the boom while wind load rises. Do not disconnect a loaded boom-end line by hand. If a fitting must be touched, first unload it through the system.
If the manoeuvre becomes confused, return to the briefed safe course with the boom on its controlled side. Pause and reorganise. A delayed gybe in clear water is better than finishing because the crew has already begun.
Inspect and release without entering the load path
After each use, ease the preventer under control and inspect the line where it passed blocks and edges. Check the boom attachment, turning blocks, shackles, deck fittings, and cleat for movement or chafe. A small glazed patch can show heat or friction from load.
If the sail backs against the system, correct the course and unload the boom before trying to clear a jam. Do not stand beside the tensioned line or strike hardware. Maintain distance and use the boat's emergency procedure.
Store both sides so they cannot trail in the water or foul sheets, anchors, and feet. Mark line ends only in ways that do not create a stopper where the system must run free.
Log any shock load or accidental gybe even if no damage is obvious. A rigger can inspect questionable fittings. The preventer earns trust through a known load path, clean release, and regular inspection, not through surviving one uncontrolled event.
Rehearse an unloaded cockpit drill. One person calls the downwind course, another identifies the working preventer, and a third points to the safe release. Move the boom through the sequence only under the skipper's dockside procedure. Watch where the lazy line crosses stanchions and where the working tail would travel. Correcting those paths without pressure is easier than discovering them with the sail full.
Then test communication under a simulated gybe. The helm calls for mainsheet control; the trimmer repeats; the preventer handler confirms the working line is unloaded before easing. Each person pauses if the previous state is not visible. Those pauses are part of the system.
Write an equipment record with line size and material, source fitting, turning fitting, cockpit control, inspection date, and the authority that approved the arrangement. Do not infer strength from appearance. Sun damage, knots, side-loading, and a block's attachment can change the usable system even when rope looks substantial.
Include preventer status in every course-change brief. A turn toward the restrained side can load the sail against the line before anyone remembers it is set. Saying “preventer on port, release ready” makes the hidden restraint part of the helm picture.
Add a release test to the equipment inspection. With the system unloaded and the boom supported under the boat's procedure, take up slack, cleat, and ease using the exact cockpit position intended at sea. Confirm the tail remains long enough to control, cannot run into a stopper prematurely, and does not cross a seat or companionway. Then repeat from the other side because deck leads are rarely perfect mirror images.
Keep the preventer separate from casual tie-downs in storage and language. A crew member who mistakes a sail cover line for the working system may attach it to an unrated point. Colour, end marking, and a rigging diagram can help, provided they match the approved setup.
If any component changes, repeat the dockside lead and release checks. A replacement block with the same nominal size can have a different attachment orientation or safe working load. Provenance for the hardware belongs with the line plan.
SailStarter's downwind lessons help you see the gybe boundary and boom danger zone before handling this system. Take that understanding to the actual boat, where an experienced skipper or rigger can approve the hardware and teach the release sequence.
Try it from the lesson
Can you spot the next move?
You pinch too long and stall head to wind, sails luffing. What's the first thing to do?
Why you can trust this guide
. We build each guide from public seamanship and safety sources, then teach the universal principle before any local difference.