Chart your course
The Clove Hitch: Fast, Adjustable, Imperfect
Quick answer
The short version
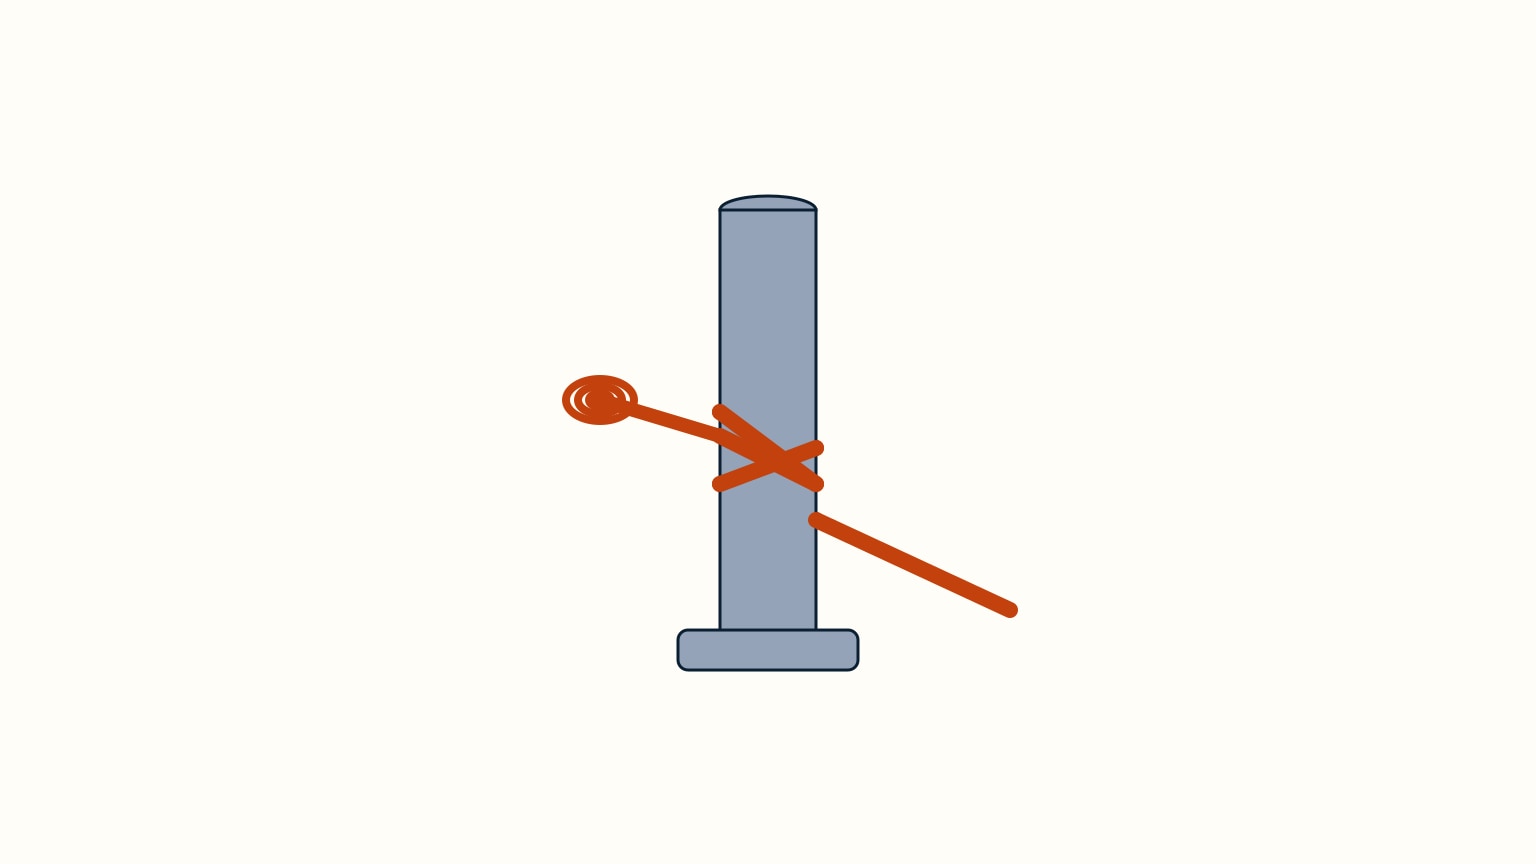
To tie a clove hitch, wrap your line once around a rail, post, or piling, then bring it around a second time so the new turn crosses over the first. Tuck the loose end under that crossing and pull everything snug. That's the whole knot. It takes seconds to tie, seconds to untie, and slides to a new spot without a full retie, which is exactly why sailors reach for it to hang a fender or hold a line to a post for a moment. Its trade-off is honesty, not disguise: a bare clove hitch can slip under a shifting load, and piling on extra turns to fight that can jam it solid instead. Leave anything hitched this way unattended, and back it up with two half hitches.
The clove hitch is one of the first knots most sailors learn, and one of the few they end up tying almost without thinking. Two crossing turns around a rail (nothing more) make it about as fast as a knot gets, and unlike most of what holds a boat together, it slides to a new height without ever coming fully undone first. That's why it's the standard way to hang a fender, and why it turns up anywhere a line needs to grip a post or rail briefly: a dinghy's painter looped over a piling for a minute, a line held while your hands are needed elsewhere, or a line belayed to a rail while you sort out the rest of the job. Away from boats entirely, it's also the knot that starts and finishes a lashing binding two poles together, the same crossing doing the same job on wood instead of a rail. It's also a knot with real, well-documented limits, and knowing them is half of using it well. This guide covers tying it correctly, why it sometimes lets go (or won't let go at all), and how to make it trustworthy enough to leave alone.
Tying the Clove Hitch, Step by Step
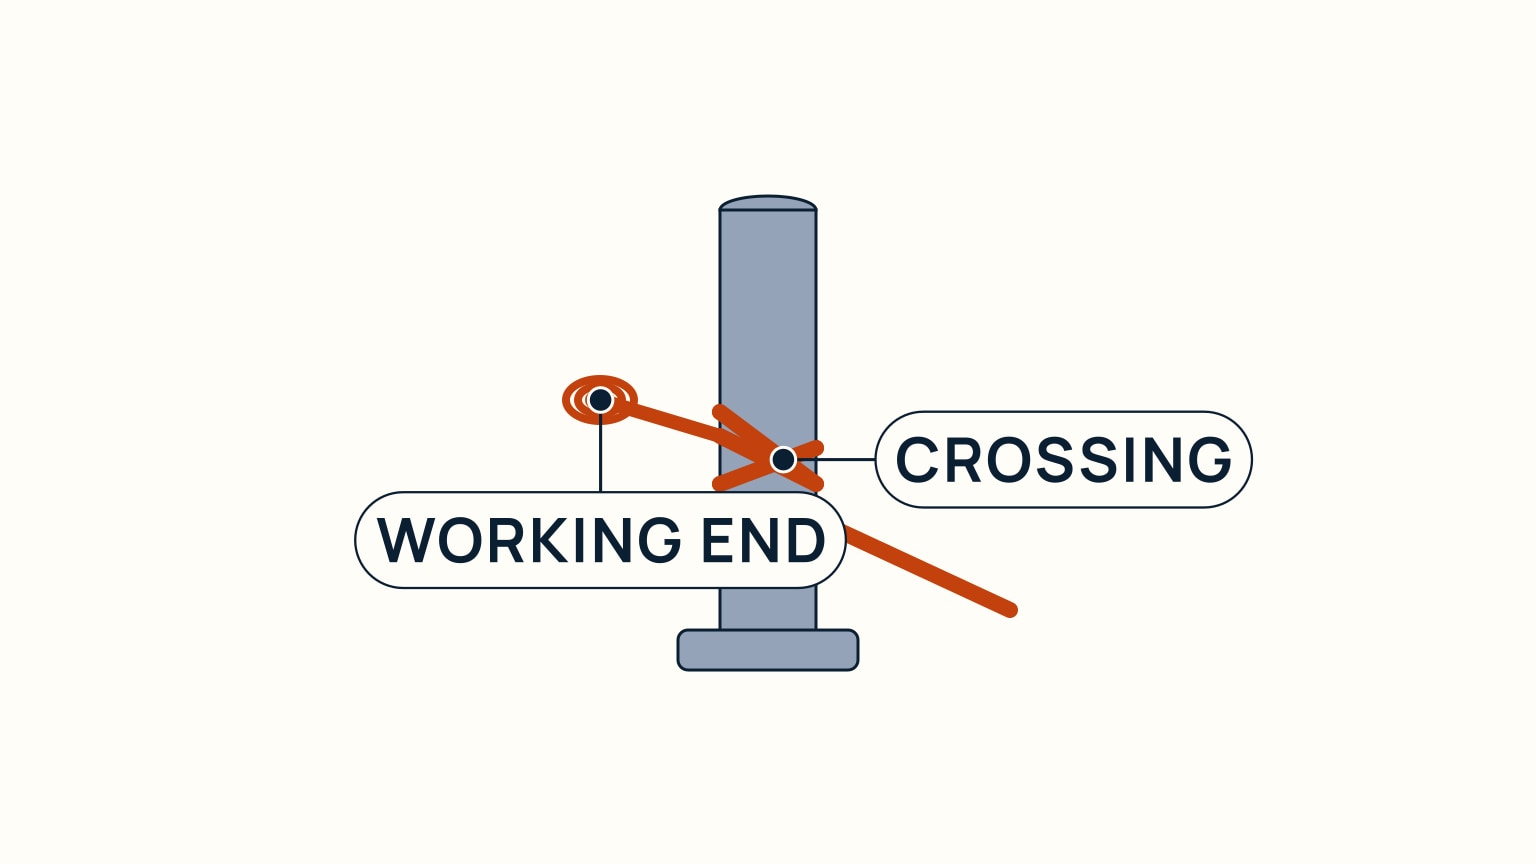
Start with your line clear of the post (the rail, stanchion, or piling you're tying to). Two terms are worth knowing before you start: the working end is the loose end you're moving, and the standing part is the rest of the line, running back to whatever you're securing. Wrap the working end once all the way around the post, so it crosses back over the standing part. Wrap a second time in the same direction, letting this new turn cross over the first rather than beside it; you should see a clean X where the two turns meet. Finally, tuck the working end under that crossing (threading it beneath the X you just made), and pull the whole thing snug so the turns bite against each other and against the post.
That tuck is what holds the knot together. Without it, you'd just have two loose loops that any tug could unwind. On a smooth, rounded rail this takes less time to tie than to describe. On a square post or a rail with sharp corners, it holds less predictably, since the crossing has no even, cylindrical surface to grip evenly. Reach for a different knot there if one is available.
There's a second way to tie it that's faster still when the top of the post is free, a piling with nothing above it, for example, or a stanchion you can lift the loop clear over. Form the crossing first, off the post, by making two loops in your hand so the second sits directly over the first with the same X pattern you'd get by wrapping. Drop the whole thing over the post and pull it snug. It's the same finished knot; you're just building the crossing in the air instead of around the post itself, which saves a step when the post's end is open.
Why It Slips, and Why It Can Jam
A clove hitch holds well under a steady pull from one direction, but it was never built for a load that keeps changing direction or coming and going. A fender hitched to a rail in a choppy anchorage can gradually walk along that rail as the boat works against it; a line held temporarily to a piling can work itself free as the boat shifts at the dock. Neither failure is sudden; it's a slow loosening, one small tug at a time, which is exactly why a clove hitch left alone for long, unwatched stretches is the risk to plan for.
The opposite problem shows up under real, sustained strain: turns that were easy to snug by hand can bind down so hard against the post that untying them afterward takes real effort. Stacking on more turns to fight the slipping only makes this worse. It just gives a heavy load more rope to jam, not more security. Both faults trace back to the same source: friction and geometry doing all the holding, with nothing else backing them up.
Back It Up: Two Half Hitches or a Round Turn
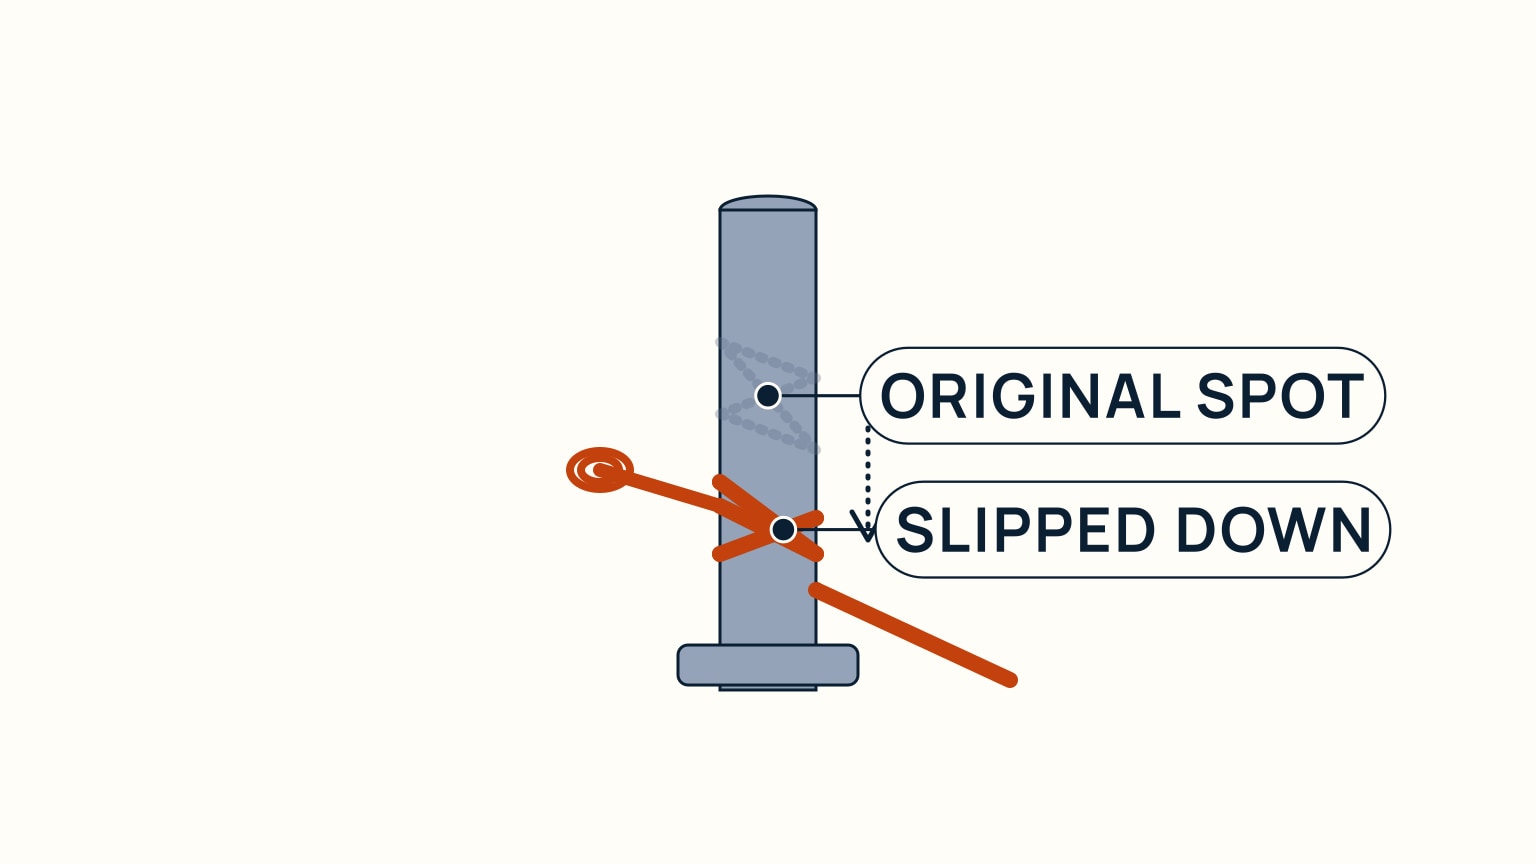
The fix for a clove hitch's honest limits isn't more clove-hitch turns; it's a backup. The simplest way: once the hitch is tied and snug, take the working end around the standing part and tie two half hitches in the same direction, the same finishing motion you'd use anywhere on a boat. A common alternative is a round turn and two half hitches, tied from scratch: pass the line fully around the post twice (this round turn alone already takes real strain), then finish with the same two half hitches around the standing part. Look closely at either backup and you'll notice those two half hitches are themselves a small clove hitch, just tied around the standing part instead of around the post.
Either backup turns a knot that depends on staying taut into one that holds even while tension comes and goes. Use one any time a line will sit unattended, ride out rough water, or carry a real load (an overnight fender, a dock line, anything you won't be there to retighten). For a quick, watched, light job, like a fender you're about to reposition anyway, the bare hitch is still the faster, right choice.
For a job that genuinely calls for security rather than speed, a backed-up clove hitch isn't the only option worth knowing. Mooring a boat, or leaving any line under real strain with nobody there to watch it, is exactly when sailors reach instead for a cleat hitch, a rolling hitch, or a bowline. Learning the clove hitch first still pays off, since the two half hitches that finish several of those other knots are the same finishing move you already know from here.
Fenders: Where to Tie the Line, and Where to Hang It
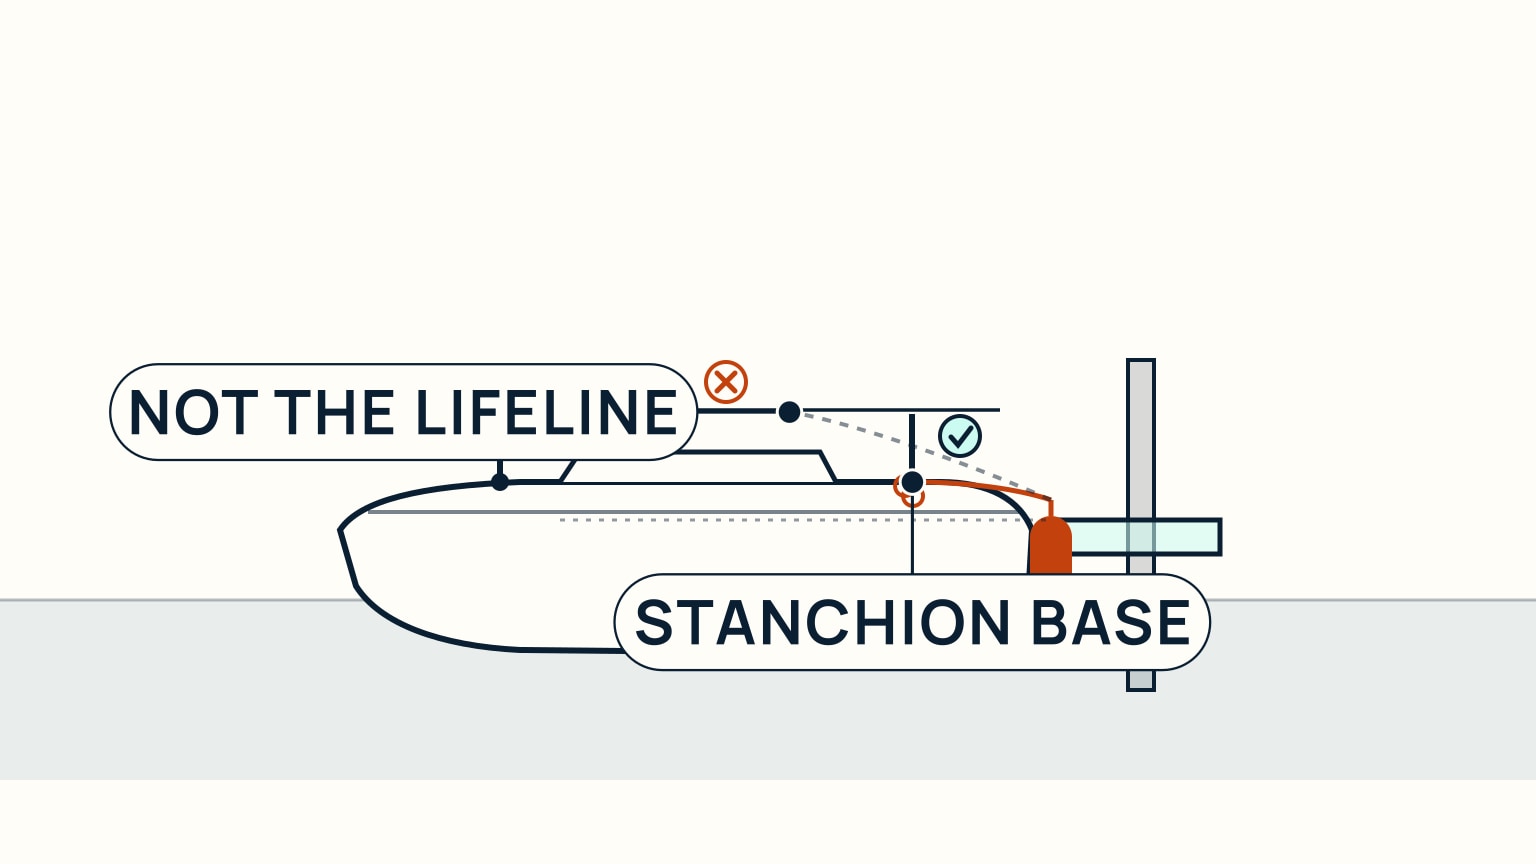
Tying the knot well is only half of hanging a fender right. Tie its line low (at a stanchion's base, or on a solid rail), never on the lifeline itself or partway up the post. A sideways pull that high has a long lever arm working the stanchion loose from the deck; the same pull taken at the base barely has one.
Placement matters as much as the hitch. At least one fender belongs at the boat's maximum beam (the widest point, and the one most likely to touch the dock or piling first), with more toward the bow and stern to cover the rest of the berth. Height matters more than how many you hang: aim each fender's own middle level with the dock edge or hull it's protecting against, since too high lets it swing clear over the edge and too low just drags it in the water.
A clove hitch is a small habit, but it's one you'll use constantly once it's automatic: fenders, a dinghy painter, a line you need to hold for a moment while your hands are busy elsewhere. It shows up on essentially every basic knot list sailors are taught, from club courses to maritime museum guides, precisely because the situations it solves come up on every kind of boat, not just one type of sailing. The honest version of this knot (tie it fast, watch it, back it up when you walk away) is more useful than wishing for one perfect knot that never needs a second thought. SailStarter's line-handling lessons walk through this kind of everyday rigging skill visually, the same way you'd actually learn it standing at a rail with a length of line in your hands, alongside the rest of the core sailing knots worth having automatic. If knots like this one are where your sailing still feels shaky, that's a good place to start.
Try it from the lesson
Can you spot the next move?
On your unloaded practice line, where do the two backup half hitches go, and how do you form them?
Why you can trust this guide
. We build each guide from public seamanship and safety sources, then teach the universal principle before any local difference.