Chart your course
How to Calculate a Course to Steer

Quick answer
The short version
To calculate a course to steer in current, begin with the track you want over the ground. Plot the current's set and drift for the planning interval as a vector, then add a boat-speed vector that closes the triangle back to the intended track. The direction of that boat-speed vector is the heading through the water you need under the assumptions used. It is a planning result, so compare it with your real track and update it when current, wind, or boat speed changes.
The useful idea comes before the drawing: your bow may need to point upstream of the destination so the current carries the boat back onto the intended ground track. The calculation makes that aim-off visible. It does not promise that wind, leeway, waves, steering error, or an imperfect current prediction will stay unchanged.
Separate track, heading, set, and drift
Your intended track is the line you want the boat to make over the ground. Heading is where the bow points through the water. In no current and no leeway, they may be close. In cross-current, they can be noticeably different. Confusing those two lines is the reason a boat can be steered carefully and still arrive down-current of the mark.
Set is the direction the current flows toward. Drift is its speed. A current setting east at two knots pushes east; it is not a wind "from the east." Write the direction and speed clearly before drawing anything. A reversed set arrow creates a perfectly neat answer for the wrong problem.
Decide the planning interval too. Vectors need both direction and a length that represents movement over a shared time. If the current is expected to change during the passage, divide the passage into shorter legs or use current information that matches the route. One average arrow cannot describe every change in a tidal channel.
This builds on set and drift, which explains how current changes course and speed over ground. Use that article first if the terms themselves still feel unfamiliar.
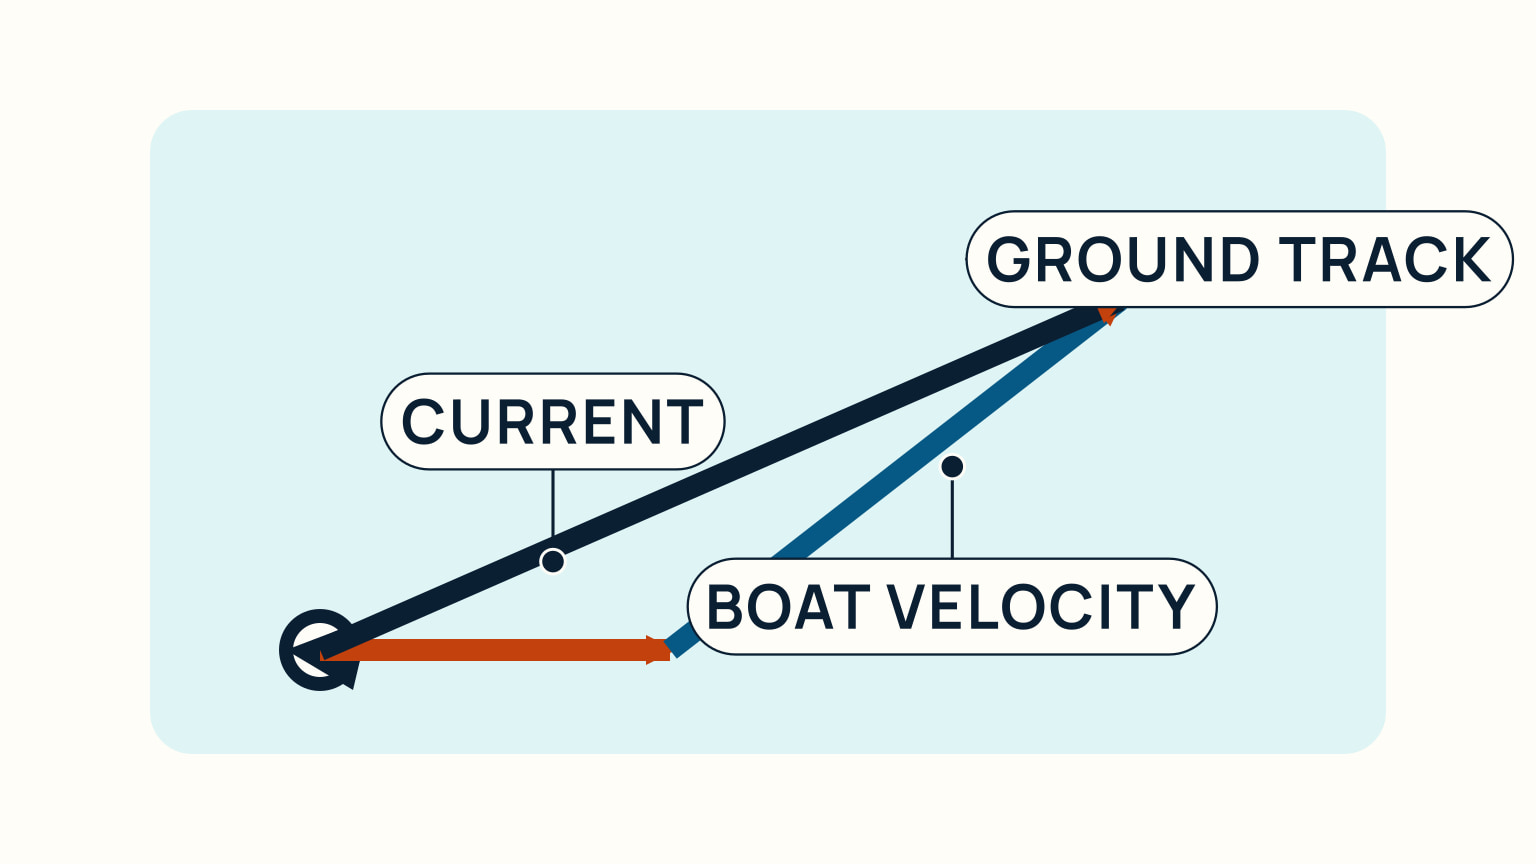
Plot the current before the boat's motion
On a chart or clear planning sheet, draw the intended track from your start toward the destination. Choose a scale and time interval that make the marks readable. From the start, draw the current vector in the direction it sets, with a length that represents its drift over that interval. Label it as current so it cannot be mistaken for the boat's path.
The end of this arrow is where the current alone would carry a passive object during the interval. Your boat will not start from that endpoint, yet the construction uses it as the first side of the vector triangle. It is a way of adding motions, not a diagram of the boat first drifting and then motoring in a straight line.
Use current information that is appropriate to the place and time. In tidal waters, current direction and rate can change through the day, and local predictions matter. Tide height and current are related but not identical. A tide table alone may not tell you the lateral movement expected along a route.
Keep chart work honest. A nautical chart provides depths, hazards, aids, and other route information. It does not make a planned line safe if the line crosses a shallow area or ignores traffic, weather, and local restrictions. Course-to-steer is one step inside a complete passage plan.
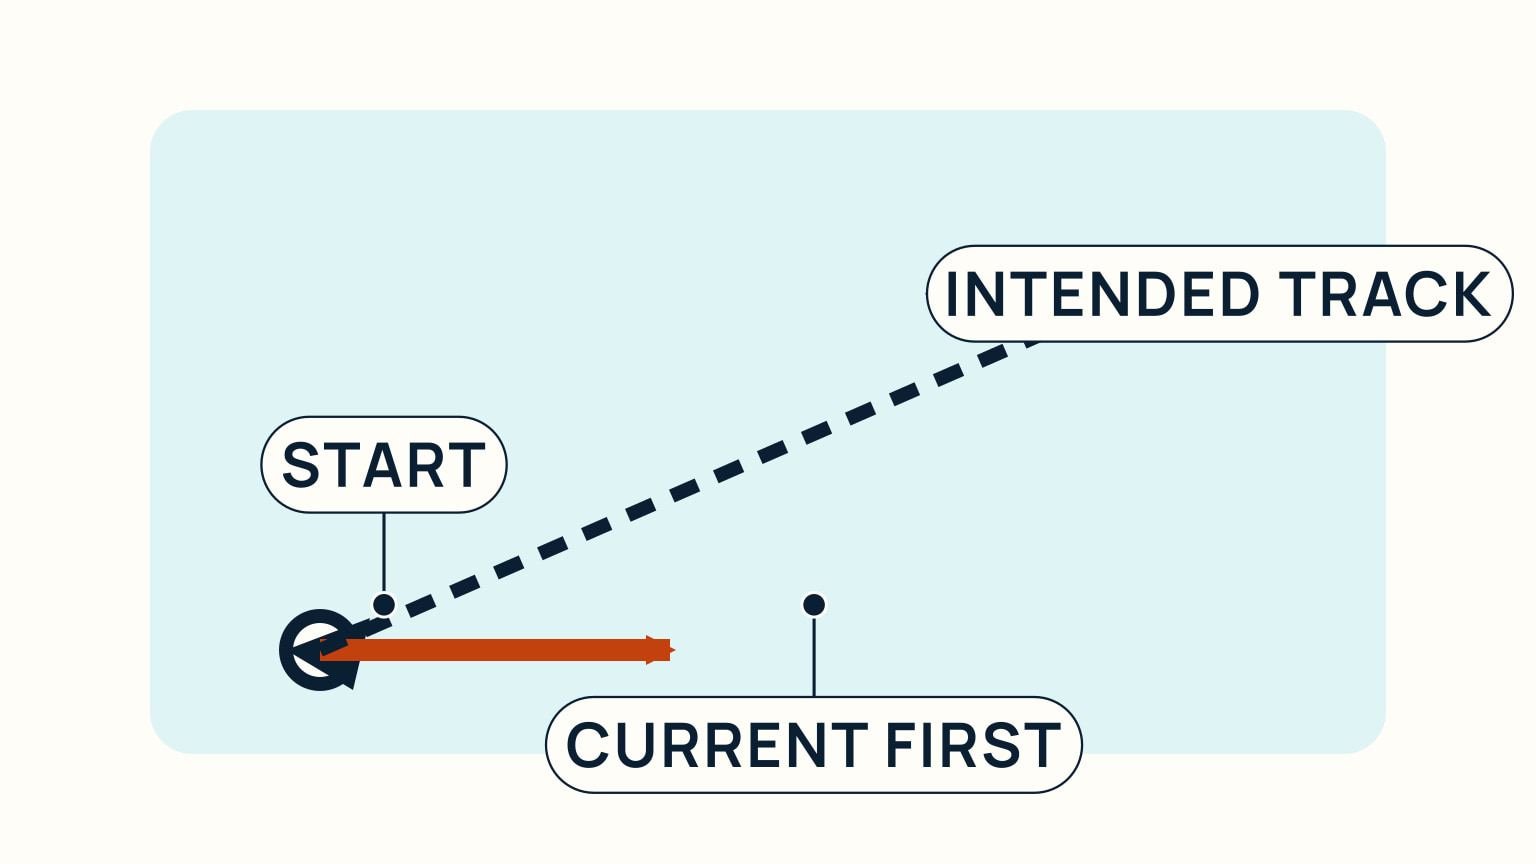
Close the vector triangle with boat speed
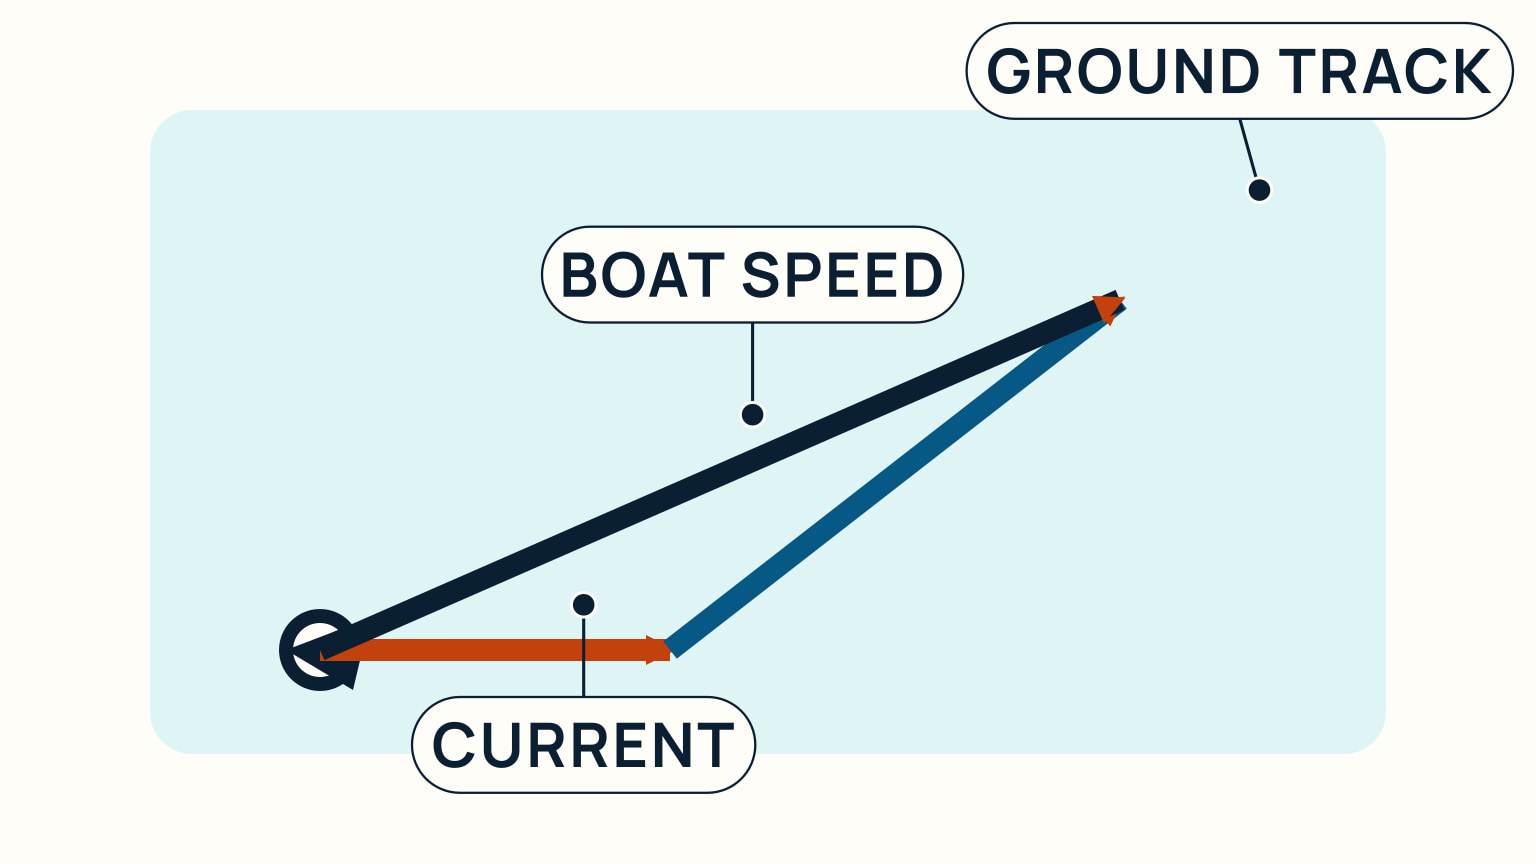
From the end of the current vector, find the point on the intended track that the boat should reach at the end of the interval. The line from the end of the current vector to that point is the boat's required motion through the water. Its direction is the course to steer, and its length represents the boat's speed through the water for the same interval.
In a paper construction, you use the boat's expected speed to find where that line can meet the desired track. In a simple example, a boat making five knots through the water needs to cross a current setting sideways at two knots. The course-to-steer line points upstream enough to provide a two-knot sideways component against the current, leaving the resultant track straight toward the mark. The resulting speed over ground is lower than five knots because part of the boat's effort is being used sideways.
That example is illustrative, not a route instruction. Change the current rate, the boat speed, or the angle of the intended track and the answer changes. The value is seeing that the three vectors must agree: current plus boat motion equals ground track.
If the boat cannot make the required water speed or course, the triangle gives a useful warning. The answer may be to delay, change route, use a different tide window, or avoid the passage. A calculation should reveal an impractical plan before the boat is committed.
Check the plan against the water
Once under way, compare heading, course over ground, speed through water if available, and the actual position relative to the charted route. A chartplotter can make the difference between bow direction and ground track easy to see. It cannot make a current forecast exact, and it cannot know whether your chosen line remains safe without current chart, depth, and lookout information.
Update early when the boat is being set off track. A small correction in open water is easier than a late sharp turn near a channel, hazard, or traffic. Watch for visual current clues too: a buoy's wake, a transit opening, streaks of water, and changing wave shape can all prompt a closer check.
In a narrow pass, use local current predictions and a route with a margin. Tidal current can increase speed or carry a vessel toward dangerous water. Wind against current can make waves steeper and shorten the time available for a correction. Course-to-steer calculations are most valuable when they help you decide whether the conditions suit the passage at all.
Pair this skill with understanding tide tables and how to read a nautical chart. The first helps you plan changing water levels; the second keeps the planned track connected to the real water around it.
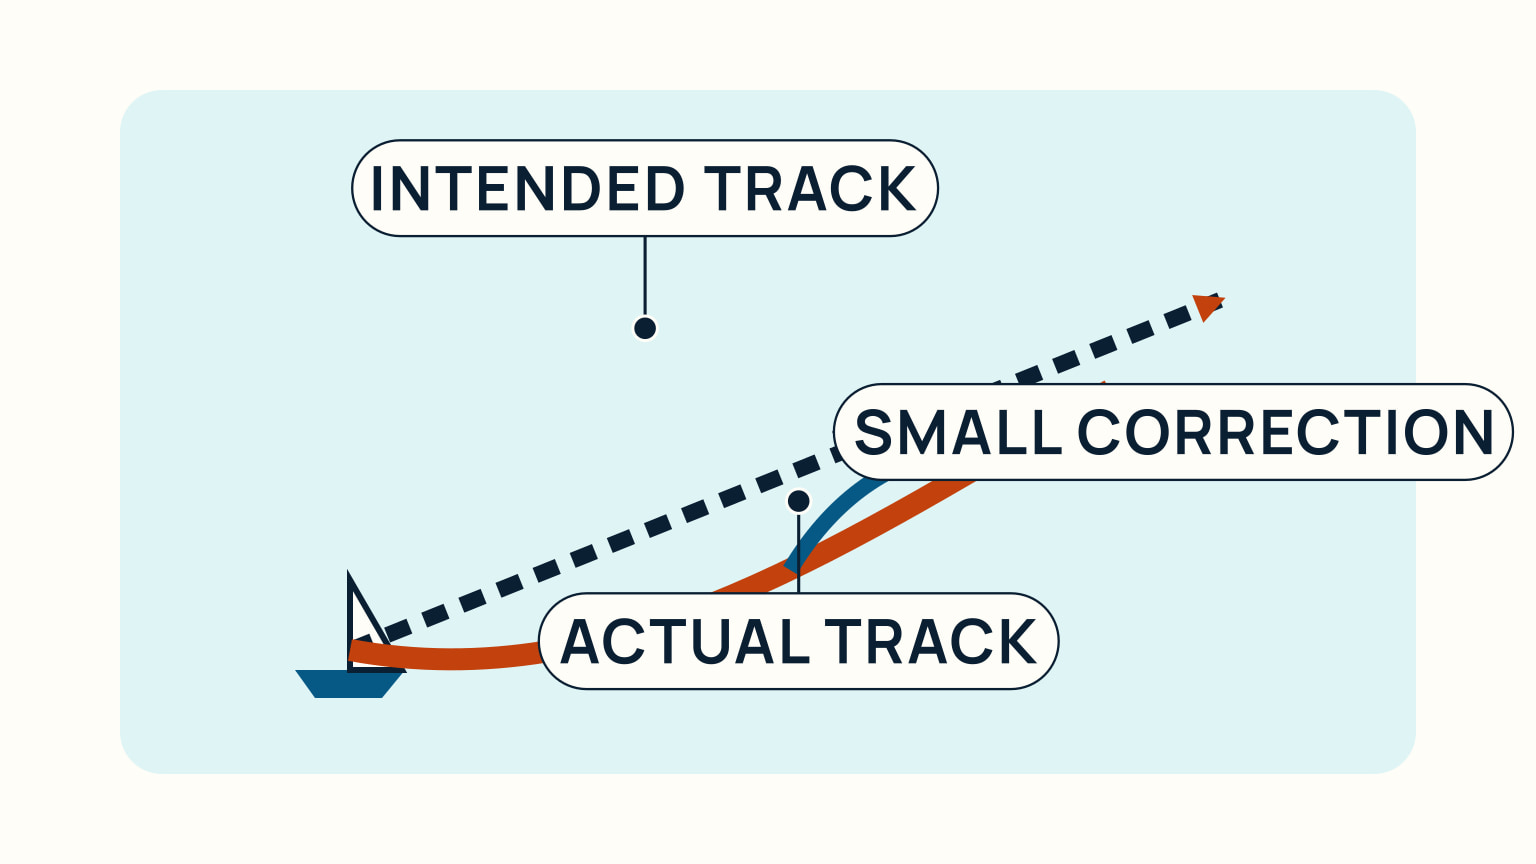
Course to steer is simply a vector answer to a practical question: where should the bow point so the boat goes where you intended? Plot the motions, state the assumptions, then let the real water correct the plan.
Keep the calculation legible enough to audit. Label the start, destination, time interval, scale, current set and drift, assumed boat speed, and resulting heading. A future check is then possible when the answer seems surprising. Do not hide uncertainty with extra decimal places. Current prediction and boat speed are estimates, so a clean construction with clear assumptions is more useful than a precise-looking number without a route, time, or source behind it.
Use the result as a starting course, then steer and observe. A changing wind can create leeway, and a changing current can make the original vector obsolete. The calculation is successful when it helps you notice and correct those changes early, not when you hold a number after the water has proved the assumptions wrong.
For an unfamiliar route, keep the first example modest. A short leg with a clear destination and an easy alternative lets you compare the plotted result with the real track. That feedback is the part that makes chartwork useful on the water.
Before drawing, make sure every direction uses the same reference and that the chart, compass information, and current data are being compared consistently. A vector construction cannot correct a mix of unlike directions. If you are unsure how a source expresses direction or time, pause and check the source notes rather than forcing it into the triangle. The quality of the plotted answer depends on the quality of the information that enters it.
On a longer route, repeat the process for each leg where current, depth, or course changes materially. A single line across a chart can hide a headland, channel, or changing tide window. Breaking it into legs keeps the drawing connected to the decisions you must make under way. Each result should still be checked against the real course over ground before it becomes a rigid instruction.
Keep a pencil record of the actual correction made on the first leg. It gives useful feedback for the next calculation and shows whether the predicted set or boat speed was close enough for the purpose. This is a learning record, not an excuse to reuse yesterday's figures when wind and current have changed.
Try it from the lesson
Can you spot the next move?
You steer a heading straight for a can buoy dead ahead, with a 2-knot stream pushing across your port beam. After an hour holding that heading, are you at the buoy?
Why you can trust this guide
. We build each guide from public seamanship and safety sources, then teach the universal principle before any local difference.